728x90
반응형
# https://github.com/open-mmlab/mmdetection/blob/master/demo/MMDet_Tutorial.ipynb 에서 발췌
# mmcv를 위해서 mmcv-full을 먼저 설치해야 함.
!pip install mmcv-full
# mmdetection 설치
!git clone https://github.com/open-mmlab/mmdetection.git
!cd mmdetection; python setup.py install
# 아래를 수행하기 전에 kernel을 restart 해야 함.
from mmdet.apis import init_detector, inference_detector
import mmcvKITTI Dataset 다운로드
- 작은 용량의 KITTI Dataset을 다운로드하고 /content 밑에 압축 해제
# 튜토리얼용 dataset
!wget https://download.openmmlab.com/mmdetection/data/kitti_tiny.zip
!unzip kitti_tiny.zip > /dev/null
import matplotlib.pyplot as plt
import cv2
img = cv2.cvtColor(cv2.imread('/content/kitti_tiny/training/image_2/000068.jpeg'), cv2.COLOR_BGR2RGB)
plt.figure(figsize=(15, 10))
plt.imshow(img)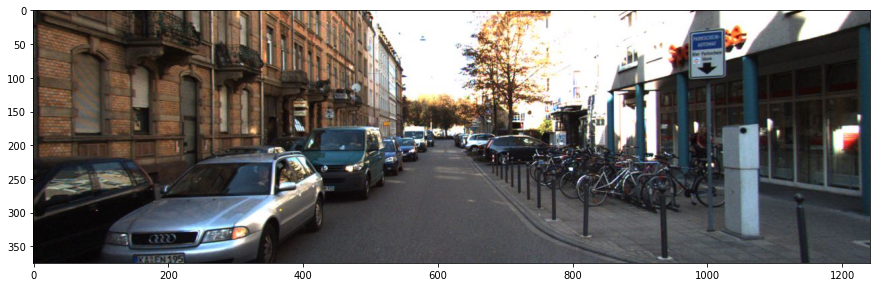
KITTI DATA FORMAT 확인
- 첫번째 컬럼은 해당 오브젝트의 클래스 명.
- 5번째~8번째가 BOUNDING BOX 정보임. 좌상단(xmin, ymin), 우하단(xmax, ymax) 좌표 임.
!cat /content/kitti_tiny/training/label_2/000068.txt

# Car 0.25 0 1.94 69.26 200.28 435.08 374.00 1.46 1.62 4.04 -3.00 1.79 6.98 1.55
# Car 0.80 1 2.26 0.00 209.20 198.59 374.00 1.46 1.58 3.72 -5.44 1.85 6.22 1.56
# Cyclist 0.97 0 2.34 1210.28 199.77 1241.00 374.00 1.55 0.57 1.73 4.04 1.69 3.57 -3.14
# Car 0.00 2 1.68 478.18 187.68 549.54 249.43 1.57 1.60 3.99 -2.73 2.03 20.96 1.55
# Car 0.00 1 1.66 530.03 187.79 573.10 226.09 1.52 1.54 3.68 -2.53 2.20 31.50 1.58
# Van 0.00 1 1.63 547.61 171.12 584.05 212.41 2.47 1.98 5.81 -2.79 2.41 46.44 1.57
# Car 0.00 1 -0.16 667.74 182.35 790.82 230.38 1.62 1.65 4.14 4.19 1.99 25.95 0.00
# Car 0.00 2 -0.11 657.37 184.48 763.34 221.64 1.55 1.66 4.47 4.35 2.10 32.00 0.02
# Car 0.00 1 -0.01 637.45 180.34 714.44 212.34 1.69 1.76 4.12 3.59 2.12 39.79 0.08
# Van 0.00 1 1.61 572.52 175.02 596.26 199.95 2.13 1.91 6.40 -2.28 2.36 65.43 1.57
# Van 0.00 1 1.77 380.78 167.69 523.29 288.56 1.95 1.75 4.63 -2.89 1.90 14.05 1.57
# Cyclist 0.00 1 1.09 958.95 167.55 1036.88 254.43 1.68 0.53 1.96 7.95 1.59 14.95 1.57
KITTI annotation 파일들의 리스트들을 가지는 파일 확인.
!cat /content/kitti_tiny/train.txt
000000
000001
000002
000003
000004
000005
000006
000007
000008
000009
000010
000011
000012
000013
000014
000015
000016
000017
000018
000019
000020
000021
000022
000023
000024
000025
000026
000027
000028
000029
000030
000031
000032
000033
000034
000035
000036
000037
000038
000039
000040
000041
000042
000043
000044
000045
000046
000047
000048
000049
mmdetection의 중립 annotation 포맷 변환. 해당 포맷은 텍스트로 변환하지 않음. 바로 메모리 상의 list로 생성됨.
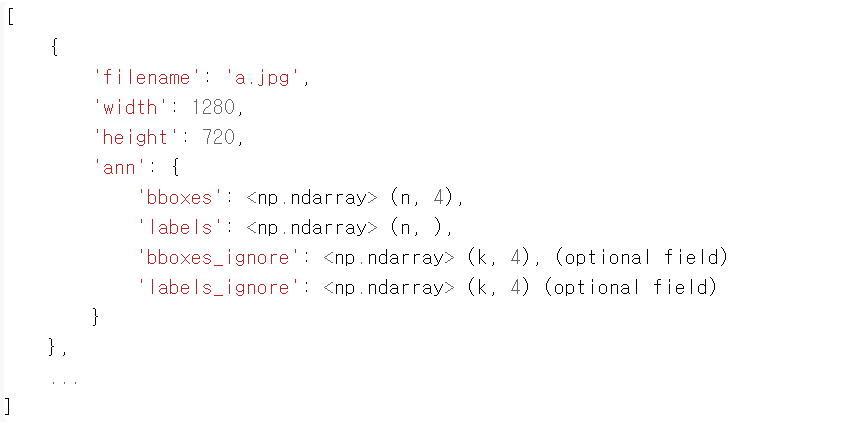
filename, width, height, ann을 Key로 가지는 Dictionary를 이미지 개수대로 가지는 list 생성.
- filename: 이미지 파일명(디렉토리는 포함하지 않음)
- width: 이미지 너비
- height: 이미지 높이
- ann: bbounding box와 label에 대한 정보를 가지는 Dictionary
- bboxes: 하나의 이미지에 있는 여러 Object 들의 numpy array. 4개의 좌표값(좌상단, 우하단)을 가지고, 해당 이미지에 n개의 Object들이 있을 경우 array의 shape는 (n, 4)
- labels: 하나의 이미지에 있는 여러 Object들의 numpy array. shape는 (n, )
- bboxes_ignore: 학습에 사용되지 않고 무시하는 bboxes. 무시하는 bboxes의 개수가 k개이면 shape는 (k, 4)
- labels_ignore: 학습에 사용되지 않고 무시하는 labels. 무시하는 bboxes의 개수가 k개이면 shape는 (k,)
kitti Dataset을 중립 데이터형태로 변환하여 메모리 로드
# 원본 kitti Dataset는 10개의 Class로 되어 있음. 'Car Van Truck Pedestrian Person_sitting Cyclist Tram Misc DontCare'
CLASSES = ('Car', 'Truck', 'Pedestrian', 'Cyclist')
cat2label = {k:i for i, k in enumerate(CLASSES)}
print(cat2label)
cat2label['Car']

# {'Car': 0, 'Truck': 1, 'Pedestrian': 2, 'Cyclist': 3}
# 0
image_list = mmcv.list_from_file('/content/kitti_tiny/train.txt')
lines = mmcv.list_from_file('/content/kitti_tiny/training/label_2/000064.txt')
#print(lines)
content = [line.strip().split(' ') for line in lines]
bbox_names = [x[0] for x in content]
#print(bbox_names)
bboxes = [ [float(info) for info in x[4:8]] for x in content]
print(bboxes)
# [[657.65, 179.93, 709.86, 219.92], [731.51, 180.39, 882.28, 275.8], [715.18, 175.63, 762.77, 203.9], [816.58, 59.74, 1112.51, 266.07], [626.78, 174.27, 647.77, 192.18], [546.19, 168.97, 554.01, 177.09]]dataset, config의 관계를 이해하는 것이 가장 중요하다.
custom dataset 생성 주요 로직
0. dataset을 위한 config 설정(data_root, ann_file, img_prefix)
- build_dataset()으로 아래 작업해줌
1. customdataset객체를 mmdetection framework에 등록
- @DATASETS.register_module(force=True) customdataset을 상속한 클래스 생성
- load_annotations()을 재정의 하여 middle format으로 원본 소스 변환
2. config에 설정된 주요값으로 customdataset 객체 생성
import copy
import os.path as osp
import cv2

import mmcv
import numpy as np

from mmdet.datasets.builder import DATASETS
from mmdet.datasets.custom import CustomDataset

# 반드시 아래 Decorator 설정 할것.@DATASETS.register_module() 설정 시 force=True를 입력하지 않으면 Dataset 재등록 불가.
@DATASETS.register_module(force=True)
class KittyTinyDataset(CustomDataset):
  CLASSES = ('Car', 'Truck', 'Pedestrian', 'Cyclist')

  ##### self.data_root: /content/kitti_tiny/ self.ann_file: /content/kitti_tiny/train.txt self.img_prefix: /content/kitti_tiny/training/image_2
  #### ann_file: /content/kitti_tiny/train.txt
  # annotation에 대한 모든 파일명을 가지고 있는 텍스트 파일을 __init__(self, ann_file)로 입력 받고, 이 self.ann_file이 load_annotations()의 인자로 입력
  def load_annotations(self, ann_file):
    print('##### self.data_root:', self.data_root, 'self.ann_file:', self.ann_file, 'self.img_prefix:', self.img_prefix)
    print('#### ann_file:', ann_file)
    cat2label = {k:i for i, k in enumerate(self.CLASSES)}
    image_list = mmcv.list_from_file(self.ann_file)
    # 포맷 중립 데이터를 담을 list 객체
    data_infos = []

    for image_id in image_list:
      filename = '{0:}/{1:}.jpeg'.format(self.img_prefix, image_id)
      # 원본 이미지의 너비, 높이를 image를 직접 로드하여 구함.
      image = cv2.imread(filename)
      height, width = image.shape[:2]
      # 개별 image의 annotation 정보 저장용 Dict 생성. key값 filename 에는 image의 파일명만 들어감(디렉토리는 제외)
      data_info = {'filename': str(image_id) + '.jpeg',
                   'width': width, 'height': height}
      # 개별 annotation이 있는 서브 디렉토리의 prefix 변환.
      label_prefix = self.img_prefix.replace('image_2', 'label_2')
      # 개별 annotation 파일을 1개 line 씩 읽어서 list 로드
      lines = mmcv.list_from_file(osp.join(label_prefix, str(image_id)+'.txt'))

      # 전체 lines를 개별 line별 공백 레벨로 parsing 하여 다시 list로 저장. content는 list의 list형태임.
      # ann 정보는 numpy array로 저장되나 텍스트 처리나 데이터 가공이 list 가 편하므로 일차적으로 list로 변환 수행.
      content = [line.strip().split(' ') for line in lines]
      # 오브젝트의 클래스명은 bbox_names로 저장.
      bbox_names = [x[0] for x in content]
      # bbox 좌표를 저장
      bboxes = [ [float(info) for info in x[4:8]] for x in content]

      # 클래스명이 해당 사항이 없는 대상 Filtering out, 'DontCare'sms ignore로 별도 저장.
      gt_bboxes = []
      gt_labels = []
      gt_bboxes_ignore = []
      gt_labels_ignore = []

      for bbox_name, bbox in zip(bbox_names, bboxes):
        # 만약 bbox_name이 클래스명에 해당 되면, gt_bboxes와 gt_labels에 추가, 그렇지 않으면 gt_bboxes_ignore, gt_labels_ignore에 추가
        if bbox_name in cat2label:
          gt_bboxes.append(bbox)
          # gt_labels에는 class id를 입력
          gt_labels.append(cat2label[bbox_name])
        else:
          gt_bboxes_ignore.append(bbox)
          gt_labels_ignore.append(-1)
      # 개별 image별 annotation 정보를 가지는 Dict 생성. 해당 Dict의 value값은 모두 np.array임.
      data_anno = {
          'bboxes': np.array(gt_bboxes, dtype=np.float32).reshape(-1, 4),
          'labels': np.array(gt_labels, dtype=np.long),
          'bboxes_ignore': np.array(gt_bboxes_ignore, dtype=np.float32).reshape(-1, 4),
          'labels_ignore': np.array(gt_labels_ignore, dtype=np.long)
      }
      # image에 대한 메타 정보를 가지는 data_info Dict에 'ann' key값으로 data_anno를 value로 저장.
      data_info.update(ann=data_anno)
      # 전체 annotation 파일들에 대한 정보를 가지는 data_infos에 data_info Dict를 추가
      data_infos.append(data_info)

    return data_infos
data_root, ann_file, img_prefix의 활용
- 학습용, 검증용, 테스트용으로 dataset이 만들어져야한다.
소스 데이터들의 학습용, 검증용, 테스트용 분리유형
- image 들과 annotation파일이 학습용, 검증용, 테스트용 디렉토리에 별도로 분리
- 별도의 메타 파일에서 각 image, annotation 지정
- image들 각 용도에 맞게 디렉토리별 분리, annotation은 각 용도별 하나만 가짐(3개 json)
* img_prefix는 여러개의 image들을 포함할 수 있는 디렉토리 형태로 지정되지만, ann_file은 단하나만 지정할 수 있음
# 학습 data config 셋팅
train.data_root=/content/kitti_tiny
train.ann_file='train.txt'
train.img_prefix='training/image_2'

# 학습 kitti data config 셋팅

train_dataset = kittiYinydataset(ann_file = train.data_root,
				data_root = train.ann_file,
				img_prefix = train.img_prefix )
반응형
'Computer_Science > Computer Vision Guide' 카테고리의 다른 글
| 4-15. tiny kitti video inference (0) | 2021.10.11 |
|---|---|
| 4-11~14. tiny kitti data로 customdataset, config 설정, image inference (0) | 2021.10.11 |
| 4-7. tiny kitti - dataset (0) | 2021.10.11 |
| 4-6. faster-rcnn pretrained model로 video inference 실행 (0) | 2021.10.10 |
| 4-3-5. MMDetection faster-RCNN pretrained model inference 실행 (0) | 2021.10.10 |